Website Construction for Visual Artists
My first portfolio site took a considerable amount of time to complete because I was trying out an ambitious structure on the first go (which I wouldn't recommend to anyone, unless you absolutely must do things ambitiously).
Next: Intro to the Web Top
Quick Overview
Just to take the mystery out of this, I'll quickly lay down my own process for creating a website.- Getting organized

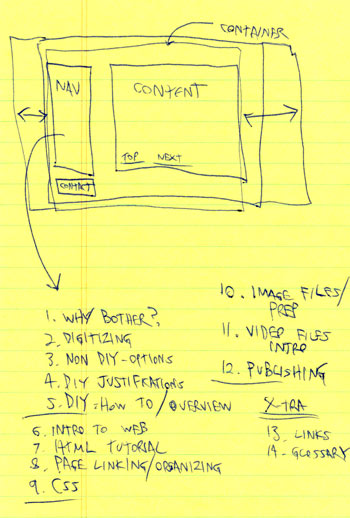
I always plan the layout and navigational structure of the website on paper first. This way I am clear about the design, as well as the number of pages and their organizational scheme.
- Preparing images

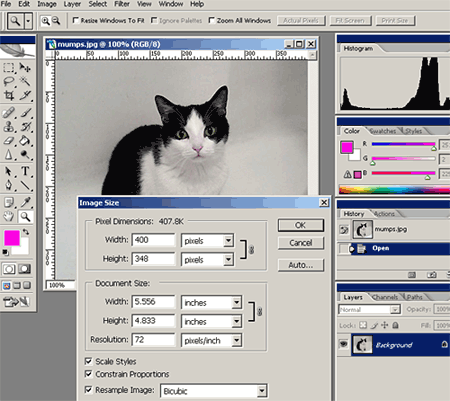
Generally, my original digitized images will be 300 DPI scans, or large digital photos from a camera. In either case, too large for the Web (they may be larger than a viewer's browser screen, and they'll take too long to download). I'll open each image in Photoshop, resize it to 72 DPI and roughly 400-600 pixels in either direction, and save them as JPEG's (or GIF's) with descriptive filenames. I'll create a second, smaller/cropped version of each image for thumbnail galleries that I shrink down to about 75-100 pixels in either direction.
Formatting all the images tends to take up the bulk of the time in creating a website. Fortunately, the "Save for Web" function in recent versions of Photoshop really speeds up this process.
- Writing HTML and CSS

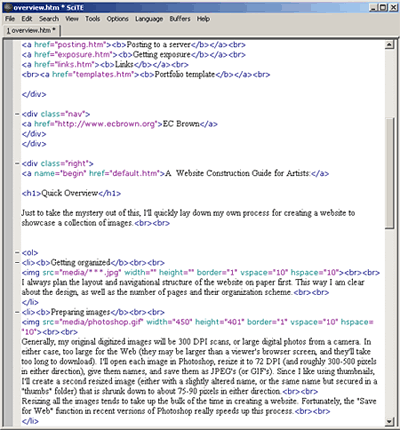
Next I'll open up a simple text-editor (SciTE is shown above) and type the HTML script that creates the different pages of the website, along with the CSS (a scripting language that is very similar in syntax) to control presentation.
With HTML I can- create the page structure
- insert text and images
- create links to other pages of the site
- add external links to other places online
With CSS I can:- control fonts
- control coloration
- control background appearances
- address a variety of other presentation issues
When I name these pages, I'll give each of them the suffix ".htm" (or ".html"), which is all a browser needs to attempt to read it as a webpage (CSS pages use the suffix ".css", and they aren't meant for browser display -- they instead inform the browser about page presentation). If I am making a series of pages that share the same visual format or scripting, I'll first make a "template" version, and test it before making all the unique copies I need. - Testing HTML pages on my own computer
These .htm/.html documents can be dropped into a browser to anticipate how it will look on the Web. Browsers do not need Internet access to read HTML files.
I usually drop a new HTML file into a browser as soon as I begin scripting, so that I have both the text-editor window and browser window open side-by-side. Whenever I save changes to the file, I can hit "refresh" on the browser and view those changes. - Uploading the site
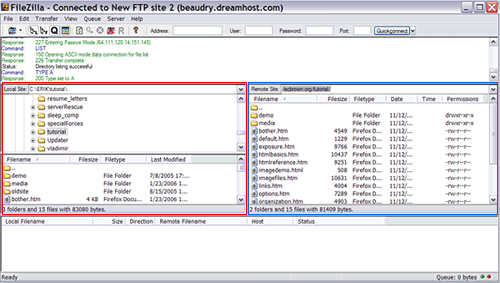
When I'm finished, I'll open up an FTP program (Filezilla is shown here, which is a free download), use it to log onto my server account used to store my website projects, and upload all the files & folders into an appropriate space on the server. In other words, by browsing and selecting the files on my home computer in the leftmost window (outlined in red), I can drag them to the rightmost window (outlined in blue), which shows the files and folders of my rented server account. At this point, the site is going "live".

- Testing online
I'll immediately test the whole site to make sure I uploaded all of its contents correctly. Since I use a Windows laptop, I'll also check the site on a Mac, just to check for unexpected differences. It's also a good idea to check a site on as many browsers as possible. There is much more conformity between browsers in how they read HTML/CSS than in the old days, but it is still important to check the results between the major browsers (Firefox, Internet Explorer, Safari). Be aware that browsers do have mechanisms to attempt to overcorrect the scripting mistakes in webpages, but the way each one does it is different. Therefore, if I make HTML mistakes and the page still looks fine on one browser, it might not look right on another.
My first portfolio site took a considerable amount of time to complete because I was trying out an ambitious structure on the first go (which I wouldn't recommend to anyone, unless you absolutely must do things ambitiously).
Next: Intro to the Web Top